M1 - how to draw a Croissant?
Final presentation of croissant
Content Navigation:
[Process] :
[Reflection] :
Part 1: Croissant scans & Photography
Q: Why we have to take photos and scan our croissant?
A: The aim of this module is to learn approaches to draw the croissant the most accurately and lively. Photos could show the shape and colour difference laying on our croissants, meanwhile, the section scanning presents us the vivid internal structure, which helps us to understand how a croissant is formed and therefore helping us presenting the croissant with the most accurate structure, texture and colour.

Failed approaches before
The croissant I used in the presentation and portfolio is actually the fifth croissant I bought. All croissants bought before this one basically encountered two major problems:
1. Being pressed and flattened.
2. Taking photos from an incorrect angled perspective
The croissant photography & scanning on the left-hand side is a perfect failed example as it's short_side and long_side elevations photos were been taken with an angled perspective, instead of straight forward perspective to that elevation.
Besides the shape of this croissant is not appropriate at all, a curved croissant increases difficulty when cutting and analysing it's sectioned' internal structure.

Top View

Long_side elevation

Short_side elevation
[Three elevations of the croissant before been Photoshopped.]
The Photoshoping process

Photoshop cc 2015.5 was involved in the post-production process of these taken photos. As shown in the figure on the left-hand side, the main measures I did in the post-production were 1, using "Lasso tools" and "Magic Eraser" functioning to delete the redundant parts that surrounded the croissant, 2, adjusting "Brightness & Contrast" and "Curve" to achieve the best colour tone and colour contrast behaving on the croissant.
The photos were taken in a special photo stage settled by an A1 white paper as the background and two Fill-in lights which placed by about 30 degrees and 60 degrees. These two lights provide the condition of an omnidirectional lighting environment and keep the croissant under suitable lighting.
[The Workspace of layers and adjustment functions in Photoshop cc 2015.5]
_%E5%B7%B2%E7%B7%A8%E8%BC%AF.png)
Three cuts, named A, B, C, are located parallel on the same half of the croissant. Therefore three cut sections are made.
_%E5%B7%B2%E7%B7%A8%E8%BC%AF.png)
The three-section cuts after photoshopped.
Page 02: Three elevation & cut section sketches
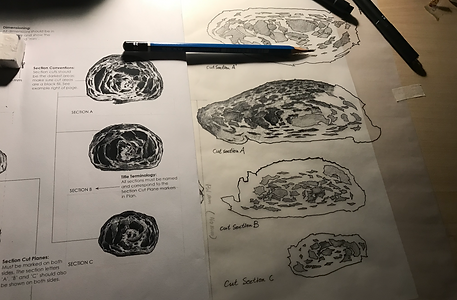
After reading the "How to layout a croissant" by Enric Miralles I started to have a general idea of how croissants can be sketched. On Survival guide, it suggests two way to do this elevation and cut section drawings, which are sketching by pencil (mainly 2H for layout, and 2B - 6B for colouring), and hatching by the pen.
The drawing of a croissant of mine was mainly drawn on A3 tracing papers. The tracing papers have higher transparency than normal sketch papers, which allows people to trace the shape from the layered object under the tracing paper. But I also realized the disadvantages of using tracing papers. Graphite from the pencil is usually harder to stick on tracing paper, and tracing paper only allows a shallow layer of graphite layered on top of the paper, otherwise, the graphite will have strong light reflection, which makes it harder to identify the shading of colour.
The shading of the croissant contains several stages. In the initial stage, the shading is comparatively thinner, which gives a general darkness & lightness relationship on the drew croissant. In later on stages, the shading gradually becomes thicker, in presenting the texture of the croissant, an irregularity surface with crispy outside crust and a fluffy inside. This shading forms different kinds of colour contrast on the croissant, which is the most important component when sketching an object.

[1]
[Shading stage 1, apply fundamental shading]

[3]
[Shading stage 3, completed]

[2]
[Shading stage 2, apply thicker shading]

[4]
[Shading completed, seen in front of light source ]
Besides, hatching by the pen is also an important measure for drawing the top view of croissant. The hatching suggests the way of using the density of line hatched, to create the relationship of lightness and darkness. In hatching the thickness of Pin Fine line pen (0.15, 0.3, 0.4) replaces the shades of pencils (2B, 4B, 6B).

[Shading of cut section]

[Shading of cut section completed]
In the shading process of the cut sections, Fine Pin pens were used to do the outside linework, and the inside texture was created by the pencil sketching. The inside part of the croissant is much more complex than the outside. There is an enormous amount of air bubble stuck in the croissant. And It requires too many contrasts in colour in order to present the right texture, thus pin-pen + pencil shading would be a good combination.

" Light source control in order to control the depth of shadow painted... "
When I did the sketches and shading on tracing paper I always keep only a single light source in the room, thus the light reflection on tracing paper won't be too much, it would also be easier to identify the relationship of lightness and darkness.
Page 03: Axonometric Working
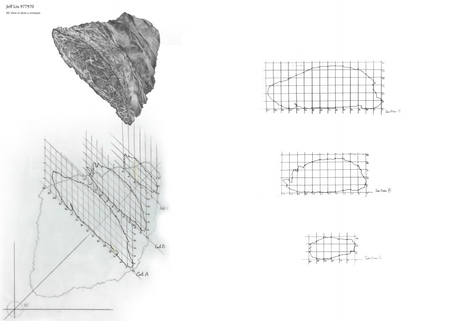
In axonometric working, I basically do things based on the cut sections. First, we have to draw grids with a 10mm gap in between to cover each section up. Then I mark the interception point of the edge of the cut section and the grid drew. Then draw the edge of the cut section based on interception points. This step basically looks in the following ways:
_%E5%B7%B2%E7%B7%A8%E8%BC%AF.jpg)
[Shading of cut section]
_%E5%B7%B2%E7%B7%A8%E8%BC%AF.jpg)
[Axonometric working of cut section]
Then the axonometric working will be placed perpendicularly intersected with the midline of a 45 degree placed bottom view of the croissant. The grids are also been duplicated with a 45-degree angle on the bottom view, and the intersection points in the grid actually provide a shape for every cut sections, placed on different cut positions on the bottom view. When drawing the grids, T-Square is used with other rulers to ensure every two lines towards the same direction are parallel.
In actually manualment I used a masking tape to stick the original bottom view layer (with 45 degree placed angle) below the axonometric layer and did the tracing. In this approach, I could re-recreate half of the croissant by connecting the sections through the bottom view in the axonometric working. The results are shown below:
_JPEG.jpeg)


[Process of shading the axonometric half of cut croissant]
The grids and the cut section's intersection points in it plays an essential when locating the air bubbles within the croissant in drawing the half of croissant. The 10mm*10mm gapped grid lowers the location uncertainty of bubbles in cut, as people can compare each grid block with the original flat one, and accurately estimated the position of gluten and air bubble.
General Reflection:
After completing this module, I learnt techniques that we could used on a post-production of images taken, such as controlling the lightness & contrast, adjust color balance (tone adjustment), curve and image saturation; as well as how to set up a own photostage that offers enough and appropriate lighting, using sketching and hatching technique to create shading contrast and therefore expressing texture of one painted object. Or even manually completing the axonometric working which helps me understand more about the relationship of a internal cut section's structure and a whole object's layout.
But what I think I learnt even more through the drawing practices is a mind, a sensitive observation ability to one's s layout, to analysis the object's structure, understand it, and by the end even re-create that structure. The bubble inside a fluffy croissant would be a perfect example: The oven heat up the croissant from outside to inside, the outer part of the croissant is actually harder than the inside, which makes the inside air more difficult to escape or expand. That's why in the cut secture we could see the croissant has a structure of bigger and less quantity air bubble in middle, but smaller with more quantity bubbles on the outer side of the bread roll, this also leads to a difference in texture presented by the bread roll, which in all, helps me gaining a observation and analysis skills on even small details in one simple object , as well as it's related environment. I think these skills will be even more important not only when I'm through in leaning and investigating architecture, but to breaks down the world and other issues in the future.
Reference:


